

How to Make Resin Petri Dish Coasters
Scroll
If you've ever looked at resin petri dish coasters and thought, "How on earth does it look like the ink is blooming in there?" - you're not alone. These mesmerizing coasters blend chemistry and creativity into a single project that's perfect for beginners and seasoned resin artists alike.
This guide will teach you the how and the why. You'll walk away understanding not just the steps, but also the science behind what makes petri dish coasters so hypnotically beautiful. Let's dive in.
What Is a Resin Petri Dish Coaster?
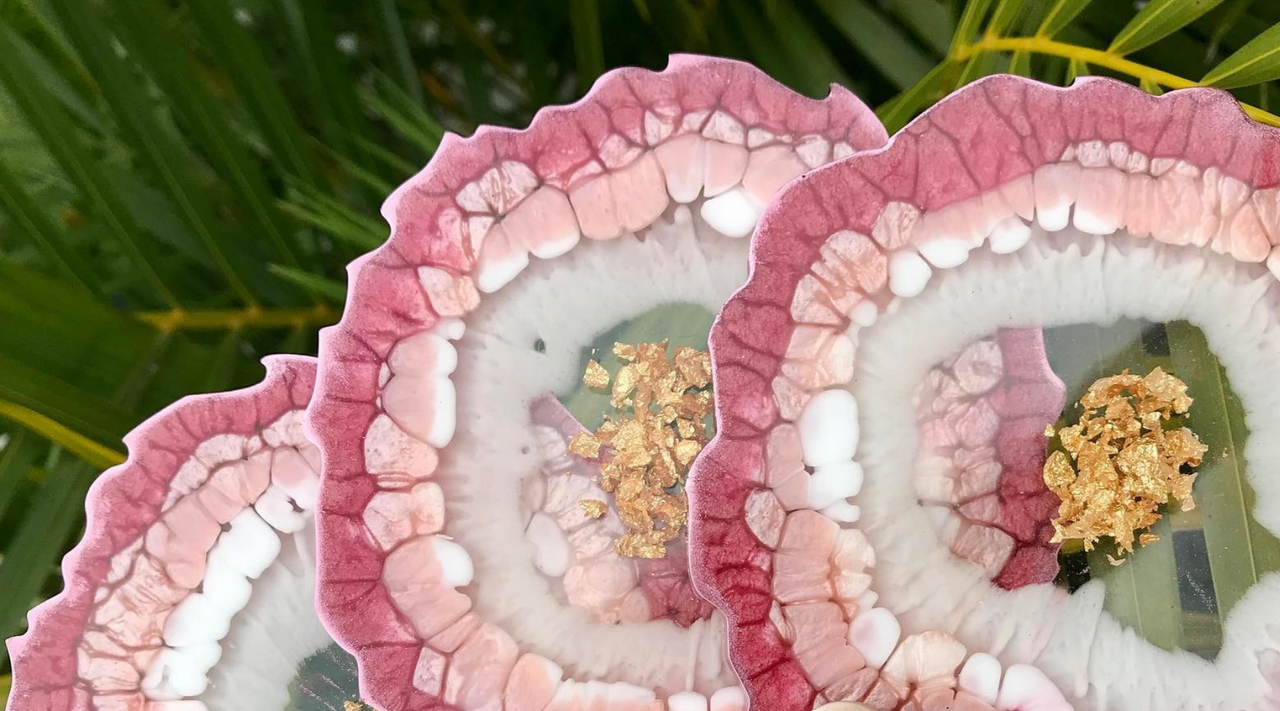
A resin petri dish coaster mimics the appearance of blooming cells under a microscope - only with way more color. Alcohol inks dropped into freshly poured resin react in fascinating ways, creating dreamy "clouds", wispy tendrils, and vibrant explosions of pigment.
They're often made in round silicone molds (which is where the "petri dish" name comes from), but the effect works in square or irregular molds too.
Tools & Materials You'll Need
To do this right, don't just grab random supplies from your craft drawer. You'll want high-quality resin and the right kind of alcohol ink to get the cellular bloom effect. Here's your checklist:
Tools:
- Silicone coaster molds (round or square)
- Mixing cups and stir sticks
- Nitrile gloves
- Butane torch or heat gun
- Toothpicks or skewer sticks
- Dropper bottles (optional but helpful)
Materials:
- Promise Table Top Epoxy
- Alcohol inks
- White pigment ink (this is key!)
- Optional: metallic powders, glitter, or foils for accent.
The Chemistry Behind the Petri Effect
Let's nerd out for a second: what causes the blooming effect in these coasters?
It comes down to density differences between the alcohol inks and the white pigment ink. Most colored alcohol inks are lightweight and sit near the surface of the resin. But white ink - being heavier - sinks. When you layer white ink over the color, it forces the colored pigment downwards in tendrils, creating that blooming or cell-like effect.
The speed at which the resin cures affects how much movement happens before the pattern locks in place. That's why working time and timing are critical.
Instructions
Here are the step-by-step instructions we recommend following to get the most out of your resin petri dish coaster project.
1. Prep Your Workspace
- Cover your table with a silicone mat or parchment paper.
- Make sure your molds are clean and dry.
- Use mold release if you want easier demolding.
2. Mix Your Resin
- Measure and mix your resin according to the manufacturer's instructions. For Promise Table Top Epoxy, it's a 1:1 ratio by volume.
- Stir slowly for at least 3-5 minutes, scraping the sides and bottom of your cup.
- Let the resin rest for a couple of minutes to reduce bubbles.
- If you need a video tutorial on how to measure, mix, and pour Table Top Epoxy you can find it here.
3. Pour the Resin Into Molds
- Slowly pour the resin into your coaster molds, filling them about 2/3 to 3/4 of the way.
- Pop any surface bubbles using a torch or heat gun with light, sweeping motions.
4. Start the Ink Dance
Here's where the magic happens - and the order of operations matters.
- Drop your colored alcohol inks into the resin, spacing them out slightly.
- Wait about 30-60 seconds.
- Drop white pigment ink directly over each color drop. This is the "weight" that pushes the colors down.
- Optional: use a toothpick to swirl or guide ink movement - but keep it light-handed.
Pro Tip: Use 2-3 drops of colored ink followed by 1-2 drops of white on top. Overloading the resin can muddy the effect. Less is more here.
5. Let It Cure
- Cover your molds with a dust protector (upside-down box, plastic lid, etc.).
- Let the resin cure undisturbed for 24-72 hours, depending on the resin type and room conditions.
- Once fully cured, gently demold your coasters.
Customization Ideas
Once you've mastered the basics, you can experiment with advanced techniques:
- Galaxy Effect: Add dark alcohol inks (navy, violet, black) with metallic flecks for a space-inspired look.
- Layered Biology: Let the first layer cure slightly, then add another layer of resin and repeat the ink process for dimensional blooms.
- Reverse Bloom: Drop the white first, then the color - great for reverse effects or accidental save jobs.
Troubleshooting & Tips
Problem: The white ink sinks too fast.
Fix: Your resin may be too thin. Try letting the resin sit for 5-10 minutes before adding ink, so it thickens slightly.
Problem: Inks aren't blooming at all.
Fix: Make sure your white ink is actually pigment-based, not just alcohol-based. Pigment inks are heavier and denser.
Problem: Coaster stuck in mold.
Fix: Use mold release spray before pouring, and ensure the resin is fully cured before demolding.
Final Thoughts: Why Petri Coasters Are More Than Just Pretty
These coasters don't just look cool - they're an awesome way to understand how density, timing, and chemistry come together in resin art. They're also great gifts, easy to batch-produce, and a fun experiment that rarely turns out the same way twice.
If you've got a curious, experimental spirit, resin petri dish coasters are the perfect entry point into the world of alcohol ink and epoxy fusion.
Ready to Try It?
We recommend starting with our Table Top Epoxy. Pair it with your favorite inks and tag us at @promiseepoxy to show off your creations!
Watch The Full Tutorial Here 👇